

Description
Solving the Red Light Blinking Issue on the Epson L3216 Printer Using Adjustment Program
The Epson L3216 printer is a versatile all-in-one ink tank printer known for its efficiency and high-quality output. However, users may encounter a common issue where the red light blinks continuously. This blinking often indicates a problem that can stem from various issues, including ink overflow, paper jams, or software malfunctions. This guide will focus on resolving the red light blinking issue using the Adjustment Program, which allows users to reset the printer and address specific faults.
Understanding the Red Light Blinking
Before diving into the solution, it’s crucial to understand what the blinking red light signifies. In most cases, the red light indicates one of the following issues:
1.Ink Absorber Full: The printer has a built-in ink absorption system that collects excess ink during cleaning cycles. Once it reaches its capacity, the red light will blink.
2.Paper Jam: There could be a blockage or paper stuck within the printer.
3.Software Issues: Sometimes, firmware or driver problems can cause the printer to malfunction.
4.General Maintenance Required: Regular maintenance might be needed to keep the printer operating smoothly.
Using the Adjustment Program
The Adjustment Program is a specialized tool designed for Epson printers, enabling users to reset the ink counter, perform maintenance tasks, and diagnose errors. Here’s a step-by-step guide on how to use this program to resolve the blinking red light issue.
Step 1: Download the Adjustment Program
Find a Reliable Source: Ensure you download the Adjustment Program from a reputable website. Be cautious of any site that seems untrustworthy.
Install the Program: Follow the installation instructions. Usually, it will be a straightforward process involving extracting files and running the setup.
Step 2: Prepare the Printer
1.Turn Off the Printer: Before connecting the printer to your computer, ensure it’s turned off.
2.Connect the Printer to Your Computer: Use a USB cable to connect the printer directly to your PC. This connection is necessary for the Adjustment Program to communicate with the printer.
3.Turn On the Printer: Once connected, power on the printer.
Step 3: Running the Adjustment Program
1.Open the Adjustment Program: Launch the program you installed.
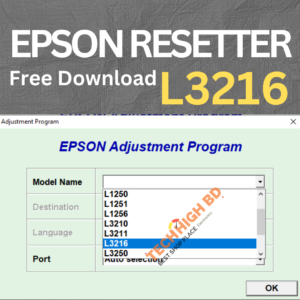
2.Select Your Printer Model: The software will typically require you to select your printer model. Choose the Epson L3216 from the list.
3.Choose the “Waste Ink Pad Reset” Option: Look for the option that mentions resetting the waste ink pad counter. This step is crucial if the red light is due to the ink absorber being full.
4.Follow On-Screen Instructions: The program will guide you through the reset process.
5.Complete the Reset: Once you have followed the prompts, the program will confirm that the waste ink pad has been reset.
Test the Printer: After resetting, turn off the Adjustment Program and restart your printer to see if the red light issue is resolved.
Step 4: Additional Maintenance
If the red light continues to blink after resetting the ink pad, consider the following:
1.Check for Paper Jams: Open the printer and check for any jammed paper. Remove any obstructions carefully.
2.Inspect Ink Levels: Ensure that your ink tanks are adequately filled.
3.Perform a Cleaning Cycle: Use the printer’s built-in cleaning cycle to clear any potential clogs in the print head.
4.Update Epson l3216 Printer Drivers: Your printer drivers are up to date. Outdated drivers can lead to compatibility issues and operational problems.
5.Check Printer Settings: Sometimes, incorrect settings can trigger error lights. Ensure your printer settings are correct.
Understanding the Adjustment Program Features
To get the most out of the Adjustment Program, it’s helpful to familiarize yourself with its various features beyond just the waste ink pad reset. Here are some additional functions that can be beneficial:
Ink Counter Reset: If your printer is indicating low ink levels despite having ink in the tanks, this function can reset the ink counters, helping the printer recognize that there is sufficient ink available.
Print Head Cleaning: This feature allows users to initiate cleaning cycles for the print head.
Head Alignment: Misalignment can cause print quality issues such as blurry text or uneven colors. The Adjustment Program often includes options to align the print head, improving print results.
Maintenance Programs: Some versions of the software include options for various maintenance tasks. Regularly performing these can help prevent issues before they arise.
Error Code Diagnosis: The program may provide insights into specific error codes that your printer is generating. Understanding these codes can aid in quicker troubleshooting.
Troubleshooting Common Issues
Even with the Adjustment Program, users might still encounter problems.
Issue 1: Printer Not Recognized by the Program
Check Connections: Ensure the USB cable is securely connected and functioning properly. Sometimes, trying a different port or cable can help.
Driver Installation: Make sure that the appropriate drivers for your printer model are installed on your computer. Without the correct drivers, the program may not detect the printer.
Run as Administrator: Sometimes, running the Adjustment Program as an administrator can resolve detection issues. Right-click on the program and select “Run as administrator.”
Issue 2: Continuous Red Light After Reset
Recheck Waste Ink Pads: If the red light persists after a reset, the waste ink pads may actually be full. If you’re comfortable, consider checking and replacing them. This often involves opening the printer and can be a bit messy.
Firmware Updates: Occasionally, firmware updates can affect printer operations. Ensure your printer’s firmware is up-to-date to eliminate software-related issues.
Seek Professional Help: If none of the above steps work, it might be best to contact a professional service or Epson support. There may be deeper hardware issues requiring expert attention.
Issue 3: Poor Print Quality
Perform a Print Head Cleaning: If your prints are coming out streaked or faded, use the print head cleaning function within the Adjustment Program to unclog the nozzles.
Check Ink Levels: Even if the tanks appear full, check for any blockages in the ink lines. Sometimes, air bubbles can interfere with ink flow.
Use Quality Paper: Ensure you are using the right type of paper for your prints. Low-quality paper can lead to poor print results.


Facebook: techhighBD
https://web.facebook.com/techhighbd
 YouTube: techhighBD
Web: techhighBD
Imo/Skyp: +880179746448
Preventive Maintenance Tips
To avoid future issues, regular preventive maintenance is essential. Here are some best practices:
Keep the Printer Clean: Regularly clean the exterior and interior of your printer. Dust and debris can cause mechanical issues and affect print quality.
Use the Printer Regularly: Infrequent use can lead to clogged nozzles. Try to print at least once a week to keep the ink flowing.
Keep Software Updated: Regularly check for updates for both the printer’s firmware and the Adjustment Program. Staying updated helps prevent compatibility issues and bugs.
Monitor Ink Levels: Regularly check ink levels, and refill or replace tanks before they run out. This prevents sudden interruptions and can help maintain print quality.
Store Properly: If you’re not using your printer for an extended period, ensure it’s stored in a clean, dry environment to avoid dust buildup and potential damage.
Step 5: Conclusion
The red blinking light on your Epson L3216 printer can be a frustrating issue, but with the right tools and knowledge, it can be resolved efficiently. The Adjustment Program serves as an essential tool for users, allowing them to reset counters and perform maintenance tasks that keep their printers running smoothly.
Regular maintenance, timely ink refills, and prompt attention to warning signs can prevent these issues from recurring. By understanding your printer’s operational needs and utilizing the Adjustment Program effectively, you can extend the life of your Epson L3216 and maintain its performance.
Additional Considerations
While the Adjustment Program can solve many issues, it’s essential to use it judiciously. Overusing this tool may lead to unintended consequences. Always consult your printer’s manual for guidance and keep an eye on maintenance schedules. If issues persist, seeking professional help or contacting Epson’s customer support may be necessary.
Understanding the intricacies of your printer not only helps in troubleshooting but also enhances your overall experience as a user. By taking proactive steps in maintenance and using the right tools, you can keep your Epson L3216 printer in optimal condition for years to come.

Reviews
There are no reviews yet.